> ## Documentation Index
> Fetch the complete documentation index at: https://trustos.telefonicatech.com/docs/llms.txt
> Use this file to discover all available pages before exploring further.
# Verify Trustpoint
To verify a trustpoint from Cert API, we have 3 ways to interact with the Blockchain network.
As an example, we will use the certificate from the following image:
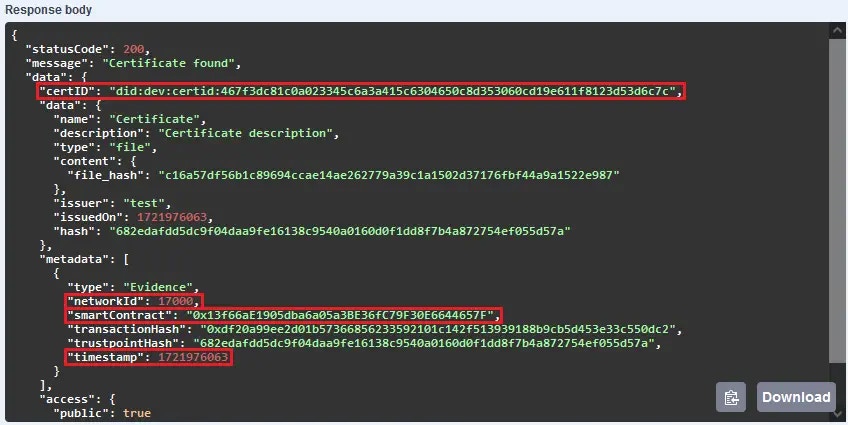 For all verification methods, the `certID`, `timestamp`, and `networkId` fields will be used. Additionally, for methods 2 and 3, the `smartContract` field will also be used. All of them are highlighted in red in the image.
## Method 1: Interact with the TrustOS API
This is the simplest and most direct method once the integration with TrustOS is done, and the one we recommend for most cases.
Essentially, you need to call the following endpoint of the Cert API:
For more detailed information on how to make this call, you can refer to the [technical documentation](/cert/utils/trustpoint) of the endpoint.
## Method 2: Interacting with the block explorer
This method depends on the existence of a block explorer that allows the query of the Blockchain where the trustpoint has been registered.
To do this, you need the address of the Smart Contract where the trustpoint has been registered (field `smartContract`) and use the block explorer corresponding to the network that appears in the `networkId` field.
In this [link](https://holesky.etherscan.io/address/0x13f66aE1905dba6a05a3BE36fC79F30E6644657F#code) the Smart Contract is shown in the block explorer.
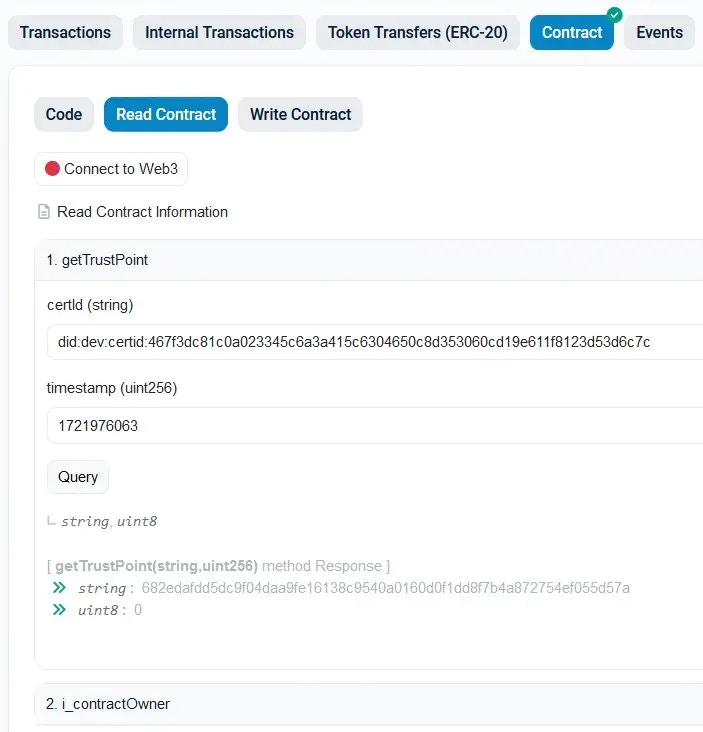
Next, you need to access the contract tab and check the available functions.
The function to call is `getTrustPoint` and the parameters to pass are the `certID` and the `timestamp` of the trustpoint you want to verify. Finally, run the function with the Query button and it will show the result, which matches the `trustPointHash` field of the trustpoint and its type (0 -> Evidence).
For all verification methods, the `certID`, `timestamp`, and `networkId` fields will be used. Additionally, for methods 2 and 3, the `smartContract` field will also be used. All of them are highlighted in red in the image.
## Method 1: Interact with the TrustOS API
This is the simplest and most direct method once the integration with TrustOS is done, and the one we recommend for most cases.
Essentially, you need to call the following endpoint of the Cert API:
For more detailed information on how to make this call, you can refer to the [technical documentation](/cert/utils/trustpoint) of the endpoint.
## Method 2: Interacting with the block explorer
This method depends on the existence of a block explorer that allows the query of the Blockchain where the trustpoint has been registered.
To do this, you need the address of the Smart Contract where the trustpoint has been registered (field `smartContract`) and use the block explorer corresponding to the network that appears in the `networkId` field.
In this [link](https://holesky.etherscan.io/address/0x13f66aE1905dba6a05a3BE36fC79F30E6644657F#code) the Smart Contract is shown in the block explorer.
Next, you need to access the contract tab and check the available functions.
The function to call is `getTrustPoint` and the parameters to pass are the `certID` and the `timestamp` of the trustpoint you want to verify. Finally, run the function with the Query button and it will show the result, which matches the `trustPointHash` field of the trustpoint and its type (0 -> Evidence).
 ## Method 3: Directly querying the Blockchain
In Blockchain networks, all information is pseudopublic since anyone can read it. To interact directly with the Blockchain, we will use what is known as the [JSON-RPC API](https://ethereum.org/developers/docs/apis/json-rpc).
This is a communication protocol that facilitates interaction with Blockchain networks based on the Ethereum client.
To make this protocol work, you need the so-called JSON-RPC-ENDPOINT. This is the "gateway" to interact with the Blockchain and is nothing more than an open connection to a node running the Ethereum-based Blockchain client that we need.
Thanks to this communication method, you can query information such as the Ethereum client implemented by the desired Blockchain, or even the networkId of the Blockchain. An example of a call for the latter would be:
```shell theme={null}
curl -X POST '' \
--data '{
"jsonrpc":"2.0",
"method":"net_version",
"params":[],
"id":67
}'
```
If we use a Polygon's JSON-RPC-ENDPOINT, the response will be 137.
```json theme={null}
{
"jsonrpc":"2.0",
"id":67,
"result":"137"
}
```
Now, for the specific case of verifying a trustpoint registered using Cert API, the call that needs to be made is called [**eth\_call**](https://ethereum.org/developers/docs/apis/json-rpc#eth_call), which executes a call to the Blockchain without creating a transaction. Since it is a read method, there will be no gas cost or network fees involved.
The call would look like this:
```shell theme={null}
curl -X POST '' \
-H "Content-Type: application/json" \
--data '{
"jsonrpc": "2.0",
"method": "eth_call",
"params": [
{
"to": "",
"data": ""
},
"latest"
],
"id": 1
}'
```
The fields to fill in are as follows:
* JSON-RPC-ENDPOINT
* SMART\_CONTRACT: Address of the Smart Contract where the trustpoint has been registered.
* INFO: Hash of the function signature and the encoded parameters `certID` and `timestamp`.
To encode the parameters, you can use the following [online tool](https://abi.hashex.org/), taking into account that the function of the Smart Contract to be called is:
```solidity theme={null}
function getTrustPoint (string memory certId, uint256 timestamp)
public view returns (string memory, TrustPointType)
```
## Method 3: Directly querying the Blockchain
In Blockchain networks, all information is pseudopublic since anyone can read it. To interact directly with the Blockchain, we will use what is known as the [JSON-RPC API](https://ethereum.org/developers/docs/apis/json-rpc).
This is a communication protocol that facilitates interaction with Blockchain networks based on the Ethereum client.
To make this protocol work, you need the so-called JSON-RPC-ENDPOINT. This is the "gateway" to interact with the Blockchain and is nothing more than an open connection to a node running the Ethereum-based Blockchain client that we need.
Thanks to this communication method, you can query information such as the Ethereum client implemented by the desired Blockchain, or even the networkId of the Blockchain. An example of a call for the latter would be:
```shell theme={null}
curl -X POST '' \
--data '{
"jsonrpc":"2.0",
"method":"net_version",
"params":[],
"id":67
}'
```
If we use a Polygon's JSON-RPC-ENDPOINT, the response will be 137.
```json theme={null}
{
"jsonrpc":"2.0",
"id":67,
"result":"137"
}
```
Now, for the specific case of verifying a trustpoint registered using Cert API, the call that needs to be made is called [**eth\_call**](https://ethereum.org/developers/docs/apis/json-rpc#eth_call), which executes a call to the Blockchain without creating a transaction. Since it is a read method, there will be no gas cost or network fees involved.
The call would look like this:
```shell theme={null}
curl -X POST '' \
-H "Content-Type: application/json" \
--data '{
"jsonrpc": "2.0",
"method": "eth_call",
"params": [
{
"to": "",
"data": ""
},
"latest"
],
"id": 1
}'
```
The fields to fill in are as follows:
* JSON-RPC-ENDPOINT
* SMART\_CONTRACT: Address of the Smart Contract where the trustpoint has been registered.
* INFO: Hash of the function signature and the encoded parameters `certID` and `timestamp`.
To encode the parameters, you can use the following [online tool](https://abi.hashex.org/), taking into account that the function of the Smart Contract to be called is:
```solidity theme={null}
function getTrustPoint (string memory certId, uint256 timestamp)
public view returns (string memory, TrustPointType)
```
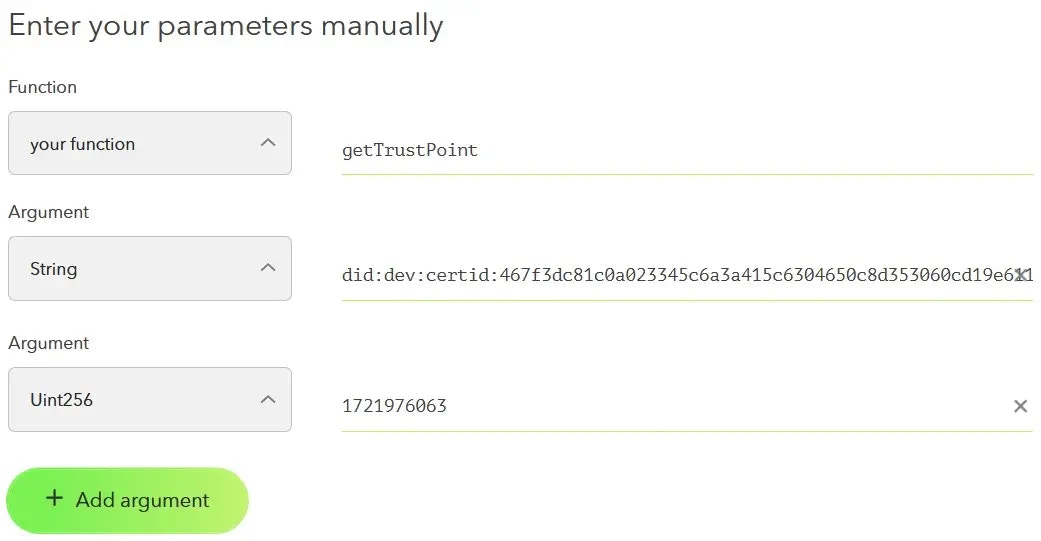
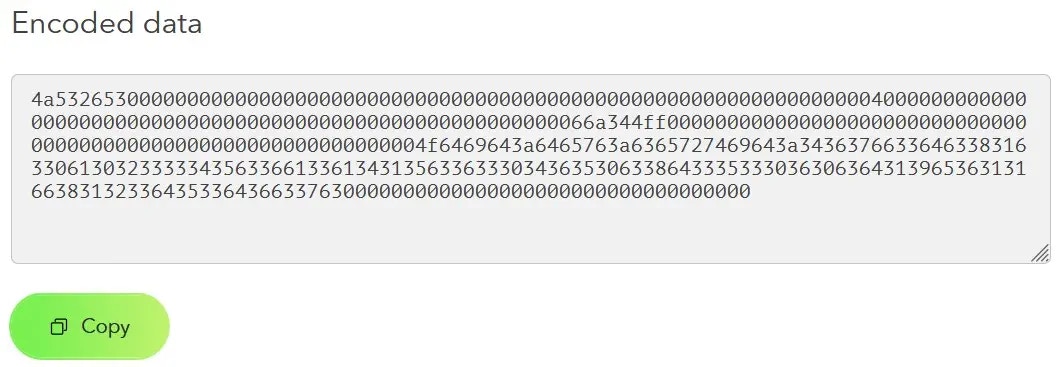 Once all the parameters are correctly encoded, the call looks like this:
```shell theme={null}
curl -X POST '' \
-H "Content-Type: application/json" \
--data '{
"jsonrpc": "2.0",
"method": "eth_call",
"params": [
{
"to": "0x13f66aE1905dba6a05a3BE36fC79F30E6644657F",
"data": "0x4a53265300000000000000000000000000000000000000000000000000000000000000400000000000000000000000000000000000000000000000000000000066a344ff000000000000000000000000000000000000000000000000000000000000004f6469643a6465763a6365727469643a343637663364633831633061303233333435633661336134313563363330343635306338643335333036306364313965363131663831323364353364366337630000000000000000000000000000000000"
},
"latest"
],
"id": 1
}'
```
The response to this call, if done correctly, can be in 2 ways.
* Trustpoint not found
```json theme={null}
{
"jsonrpc": "2.0",
"id": 1,
"error": {
"code": -32000,
"message": "Execution reverted",
"data": "0x16fd89cc"
}
}
```
The hexadecimal value `0x16fd89cc` corresponds to the error returned by the Smart Contract when the trustpoint is not found.
The parameters entered do not match the records stored in the Blockchain.
* Trustpoint found
```json theme={null}
{
"jsonrpc": "2.0",
"id": 1,
"result": "0x00000000000000000000000000000000000000000000000000000000000000400000000000000000000000000000000000000000000000000000000000000000000000000000000000000000000000000000000000000000000000000000004036383265646166646435646339663034646161396665313631333863393534306130313630643066316464386637623461383732373534656630353564353761"
}
```
The result, encoded, is the hash associated with that certID at that specific timestamp along with the type of trustpoint (Evidence -> 0, Revocation -> 1, Signature -> 2).
To decode it, you can use the following [online tool](https://adibas03.github.io/online-ethereum-abi-encoder-decoder/#/decode).
Once all the parameters are correctly encoded, the call looks like this:
```shell theme={null}
curl -X POST '' \
-H "Content-Type: application/json" \
--data '{
"jsonrpc": "2.0",
"method": "eth_call",
"params": [
{
"to": "0x13f66aE1905dba6a05a3BE36fC79F30E6644657F",
"data": "0x4a53265300000000000000000000000000000000000000000000000000000000000000400000000000000000000000000000000000000000000000000000000066a344ff000000000000000000000000000000000000000000000000000000000000004f6469643a6465763a6365727469643a343637663364633831633061303233333435633661336134313563363330343635306338643335333036306364313965363131663831323364353364366337630000000000000000000000000000000000"
},
"latest"
],
"id": 1
}'
```
The response to this call, if done correctly, can be in 2 ways.
* Trustpoint not found
```json theme={null}
{
"jsonrpc": "2.0",
"id": 1,
"error": {
"code": -32000,
"message": "Execution reverted",
"data": "0x16fd89cc"
}
}
```
The hexadecimal value `0x16fd89cc` corresponds to the error returned by the Smart Contract when the trustpoint is not found.
The parameters entered do not match the records stored in the Blockchain.
* Trustpoint found
```json theme={null}
{
"jsonrpc": "2.0",
"id": 1,
"result": "0x00000000000000000000000000000000000000000000000000000000000000400000000000000000000000000000000000000000000000000000000000000000000000000000000000000000000000000000000000000000000000000000004036383265646166646435646339663034646161396665313631333863393534306130313630643066316464386637623461383732373534656630353564353761"
}
```
The result, encoded, is the hash associated with that certID at that specific timestamp along with the type of trustpoint (Evidence -> 0, Revocation -> 1, Signature -> 2).
To decode it, you can use the following [online tool](https://adibas03.github.io/online-ethereum-abi-encoder-decoder/#/decode).
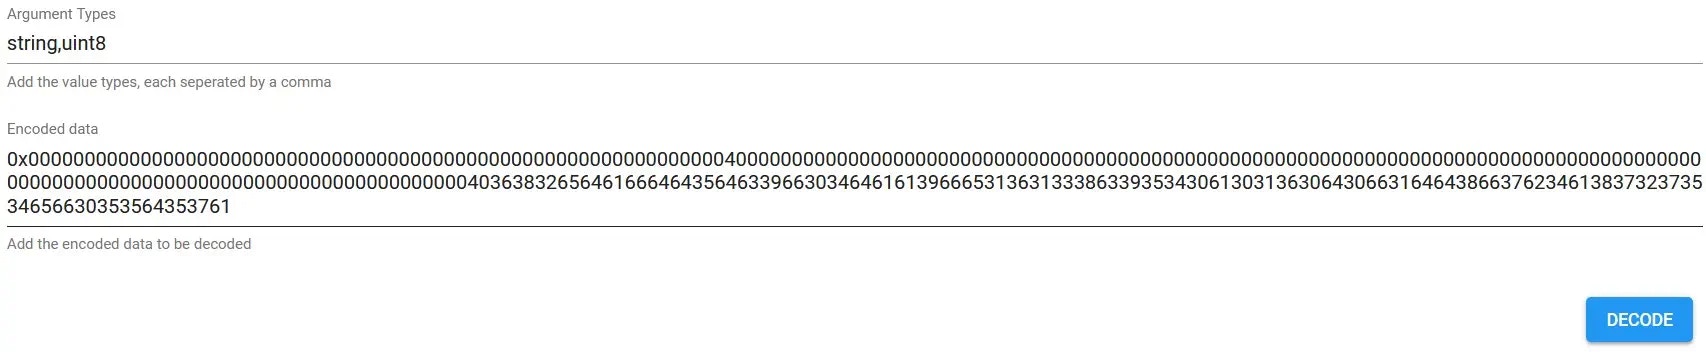
 As you can see, the first decoded parameter matches the hash of the certificate, ensuring the immutability of the information.
For Revocation trustpoints, the first decoded parameter is the double hash of the string `Certificate did:dev:certid:467f3dc81c0a023345c6a3a415c6304650c8d353060cd19e611f8123d53d6c7c has been revoked`.
Finally, for Signature trustpoints, the first decoded parameter corresponds to the double hash of the generated signature.
As you can see, the first decoded parameter matches the hash of the certificate, ensuring the immutability of the information.
For Revocation trustpoints, the first decoded parameter is the double hash of the string `Certificate did:dev:certid:467f3dc81c0a023345c6a3a415c6304650c8d353060cd19e611f8123d53d6c7c has been revoked`.
Finally, for Signature trustpoints, the first decoded parameter corresponds to the double hash of the generated signature.